


 Now available in a range of sizes to fit the whole family!
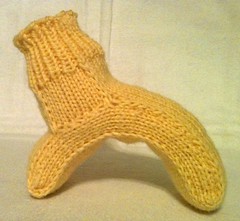
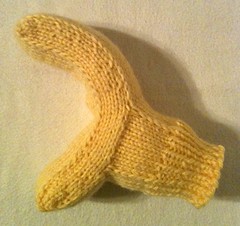
Just in time for Halloween and cooler weather (in the northern hemisphere at least), I am proud to present to you an adorable addition to your favorite child's wardrobe, accessories that resemble the molded plastic hands of those ubiquitous little toys - Lego Man Mitts!
Also available as a free pdf!
Download through Ravelry!
Materials:
Stitch Nation Washable Ewe [100% wool; 183yds/167m per 3.5oz/100g skein]; 1[1, 1, 1, 1, 2] skeins in color #3215 Duckling
US #4/3.5mm circular (for magic loop) or double-pointed needles
Tapestry needle
Stitch holder or waste yarn
Gauge:
22sts = 4in /10cm in stst
Finished Size:
Hand circumference:
5[5.75, 6.5, 7.25, 8, 8.75]in/
13[15, 17, 19, 21, 23]cm
To fit:
0-2
years[3-5 years, 6-9 years, 10 years-Adult S, Adult M, Adult L]Click here for Abbreviations
PATTERN
Fingers
 Using magic cast-on method,
CO 12[14, 16, 18, 20, 22] sts on each needle - 24[28, 32, 36, 40, 44] sts
total.
Using magic cast-on method,
CO 12[14, 16, 18, 20, 22] sts on each needle - 24[28, 32, 36, 40, 44] sts
total.
Round 1: knit.
Round 2: {k1,
m1R, k10[12, 14, 16, 18, 20], m1L, k1} twice - 28[32, 36, 40, 44, 48] sts.
Round 3: {k2,
sl1, k8[10, 12, 14, 16, 18], sl1, k2} twice.
Round 4: knit.
Round 5: k2,
sl1, k8[10, 12, 14, 16, 18], sl1, k1, w&t, p12[14, 16, 18, 20, 22] w&t,
k1, sl1, k8[10, 12, 14, 16, 18], sl1, k1, k1 tog w/wrap (insert right-hand
needle up through front of wrap then through st and k these tog), k2, sl1,
k8[10, 12, 14, 16, 18], sl1, k2.
Round 6:
k1 tog w/wrap, k to end.
Repeat Rounds 3-6 2[4, 5, 6, 7, 8] more
times. Repeat Rounds 3-4 once
more for all sizes, then Round 3 once again.
Palm (worked flat)
Row 1: k3,
place 8[10, 12, 14, 16, 18] sts on holder or waste yarn.
Row 2: sl1,
p19[21, 23, 25, 27, 29].
Row 3: sl1,
k4, sl1, k8[10, 12, 14, 16, 18], sl1, k5.
Repeat Rows 2-3 2[4, 4, 5, 5, 6] more
times. Do not turn at end of last row.
Using backwards loop cast-on
method, CO 8[10, 12, 14, 16, 18] sts and join to beg of row to begin working in
the round again, k17[19, 21, 23, 25, 27]. You should now be back to the
original beg of your rounds.
Thumb
Round 1: k16[18,
20, 22, 24, 26], sl1, k8[10, 12, 14, 16, 18], sl1, k2.
Round 2: knit.
Round 3: k2,
sl1, k8[10, 12, 14, 16, 18], sl1, k1, w&t, p12[14, 16, 18, 20, 22],
w&t, k1, sl1, k8[10, 12, 14, 16, 18], sl1, k1, k1 tog w/wrap, k2, sl1,
k8[10, 12, 14, 16, 18], sl1, k2.
Round 4: k1
tog w/wrap, k to end.
Round 5: {k2,
sl1, k8[10, 12, 14, 16, 18], sl1, k2} twice.
Round 6: knit.
Repeat Rounds 3-6 0[1, 1, 2, 3, 3] more
times. Repeat Round 5 once
more for all sizes.
Next round: {k1,
k2tog, k8[10, 12, 14, 16, 18], ssk, k1} twice - 24[28, 32, 36, 40, 44] sts.
Cut yarn, leaving about a 18-inch/45-cm
tail. Graft remaining sts together.
Cuff
Place 8[10, 12, 14, 16, 18]
sts from holder/waste yarn onto right-hand needle. With RS facing, continuing
to work around edge of opening, join new yarn and pick up & k8[9, 10, 11, 12,
13] sts along first selvage edge, pick up & k8[10, 12, 14, 16, 18] sts
along CO edge, pick up & k8[9, 10, 11, 12, 13] along other selvage edge,
k8[10, 12, 14, 16, 18] across live sts - 32[38, 44, 50, 56, 62] sts total.
Round 1: {sl1,
k6[8, 10, 12, 14, 16], sl1, k8[9, 10, 11, 12, 13]} twice
Round 2: knit.
Repeat Rounds 1-2 2[4, 5, 6, 7, 8] more
times. Repeat Round 1 once
more for all sizes.
Next Round: Dec
4[6, 8, 10, 12, 14] evenly around – 28[32, 36, 40, 44, 48] sts.
Work k1, p1 ribbing for 8[10,
12, 14, 16, 18] rounds. Bind off in pattern.
Weave
in ends. Block if desired.Feel free to comment here with questions.
This pattern is intended for personal use only. Please do not try to sell it or any product made from it. Thank you.
Any chance you could make for my son's halloween costume? I don't knit!
ReplyDeleteI created a crochet version that is quite similar. do u crochet?
DeleteYes and please, thank you
DeleteTyna, I would love to get a copy of your crochet version of these mittens.
DeleteCan I get a copy of the crochet pattern, too?
DeleteSorry, I have too much on my own plate right now to take on commission work. I'd really encourage you learn to knit though. It's a great hobby! And these mittens are not just a project for advanced knitters. Beginners could totally make them!
ReplyDeleteThank you so much for this pattern! I am working on Lego-man costumes for my two boys and these will be way better than regular gloves or making something out of plastic.
ReplyDeleteDo you have this available as a crochet pattern?
ReplyDeleteNo, I'm sorry, I don't. While I can follow a crochet pattern, I've yet to develop my skills in that craft to the point of pattern design. Tyna Reeves mentioned in a comment above that she created a crochet version, but I wasn't able to find any information about it. Maybe you could contact her and see if she's willing to share how she did it?
Deletei'd be really interested in the crochet pattern if your sharing
ReplyDeleteAs I told the previous commenter, no, sorry, I don't have a crochet version of this pattern. While I can follow a crochet pattern, I've yet to develop my skills in that craft to the point of pattern design. Tyna Reeves mentioned in a comment above that she created a crochet version, but I wasn't able to find any information about it. Maybe you could contact her and see if she's willing to share how she did it?
DeleteCarissa I love these! I've had to reverse the slipped stitches in the cuff, does that make sense, or have I missed something? Thanks for the pattern!
ReplyDeleteGlad you like them, Elizabeth! I'm not sure I understand what you mean. Reverse the slipped stitches?
DeleteHi Carissa!
ReplyDeleteI can't thank you enough for these lego pattern....they're extraordinary. Actually, i'm currently knitting them right now, and as a debutant french knitter, i'm quite proud to say that i've managed to make the fingers haha ! But, i'm having a little problem with the end of palm knitting....how do you join the sts ? Is the goal of it to knit in round/2needles (like we did with the magic cast on) ?
I'm so sorry, my understanding of knitting technics in english is quite bad... :-)
Yes, the goal is for the thumb to look just like the fingers, but shorter.
DeleteOnce you've worked the last row and cast on those new stitches, you'll loop your circular needle around, or transfer your stitches to double-pointed needles if you've been working the palm with just two needles. Then you should be able to connect the last stitch you cast on with the first stitch you knitted on that last row. Does that make sense?
If it's any consolation, I'm sure I would be a terrible knitter if I had to try to do it from French patterns! :)
Carissa, I just found ths pattern and my Grandson is thrilled. I am having a problem with round 5 of the fingers. At the end of round 4 I have 36 stitches and then round 5 has 70ish stitches...how am I supposed to work this round...Please help, Cathy
DeleteThis pattern involves short-rows to shape the curve of the fingers. In essence, you will knit some stitches, turn around and purl back across a few of them, then turn again and knit the rest of the way. So some of the stitches in each short-row round are worked multiple times. Does that make sense?
DeleteIm stuck on round 5 too. Where in the pattern does it say to turn back please?
ReplyDeleteI replied to your Facebook message, but I'll reply here as well:
DeleteThis pattern uses short-rows to shape the curved mitt. If you're not familiar with the short-row technique, it can be a little confusing. It may seem like Round 5 has more stitches than it should, but it's really just that you're working some of the stitches multiple times. When it says "w&t" (wrap & turn) you're going to stop knitting, wrap the yarn around the next unworked stitch, then turn around so the wrong side of the fabric is facing you, and purl back the other direction (reworking some stitches you just knitted). Then you'll see another "w&t" in the same round, so you'll stop again, wrap the next stitch, turn around again, and keep knitting in the direction you were originally going. Check out my abbreviations page for specific instructions on how to execute the w&t. Hope that helps!
Hi Carissa,
ReplyDeleteI'm very new to knitting but I'm going to take a shot at some lego mitts! What length of circular needles would I need for this pattern?
- Gillian
I would recommend somewhere between 36 and 48 inches. Then you can do the Magic Loop method (google it, it's fantastic!).
DeleteThanks for the reply Carissa. I happened to find some 29" circular needles in my stash of needles handed down to me and those seemed to work well.
ReplyDeleteAnother question though: at the end of the cuff, just before the ribbing, it says to decrease evenly around. Do I do that in a ribbing row? Or maybe do it in an additional round 2?
I love how these are turning out. My kids can't wait for them to finish!
The decrease row is meant to be just knit, not ribbing. For example, for the smallest size, you want to decrease 4 sts evenly when you're starting out with 32 sts. So you'd work *k6, k2tog* all the way around. If the math doesn't work out perfectly, that's fine. Just make sure you space out your decreases, but they don't necessarily all have to be exactly ___ sts apart. Does that make sense?
DeleteHi Carissa, I'm attempting to knit these lovely mittens for a 9 y.o. Double-checking your palm calculations: Palm (worked flat)
ReplyDeleteRow 1: k3, place [12] sts on holder or waste yarn.
Row 2: sl1, p[23].
It will then make it 39 stitches, not 38, won't it?! Should I k2 instead?
Thank you,
Tanya
It should actually be 36 stitches - 12 sts on the holder and 24 being worked flat for the palm. The sl1 and the first 2 purled sts from Row 2 are the same 3 sts that were knitted on Row 1 before placing 12 on the holder. Does that make sense?
DeleteHello - I am not familiar with magic is it possible to knit these mitts on 4 double pointed needles.
ReplyDeleteThanks,
Sandy
Sure, you could use DPNs instead.
DeleteHi! How many stitches should I have after row 5 and after row 6 if I'm making the biggest size?
ReplyDeletein round 5 after ktog w wrap, there are no more stitches, and no w&t instruction before knitting/slipping another 14 stitches, am i missing something? please help.
ReplyDelete