Once again, I find myself having to apologize for my extended absence. The holidays have been a bit hectic here at Casa de Carissa, what with out-of-town guests and then being the out-of-town guests. And now I've got two pattern submission deadlines fast approaching, so I've been knitting like mad. But of course, I can't show you those projects since they're for submissions. Le sigh.
I can, however, show you this super simple refashion that was about all the sewing I had time for this month. It started as a slightly too-tight dress picked up at that clothes swap I went to a couple months back.
Monday, December 31, 2012
Monday, December 10, 2012
Hand-Made Holiday
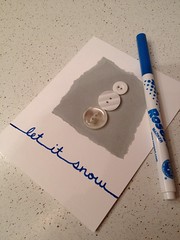
Sorry for my absence this past week. I've been feverishly crafting away on various holiday gifts, and I'm sure you understand the necessary secrecy involved. That being said, I will share with you the hand-made cards I'll be mailing out soon. They were super simple to create. Even if you can't sew a straight line or knit a stitch, you can handle this craft. Maybe even have the kiddies join in the fun (but let mom handle the hot glue gun, please).
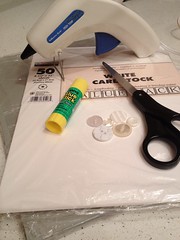
First, let's gather our materials:
Cardstock - I used 8.5"x11" sheets in white
Construction paper - light grey if you wanna copy me
White buttons in varying sizes, preferably with only two holes in the center
Scissors
Glue
Hot glue
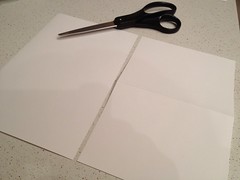
Now, we'll fold a piece of cardstock in half width-wise (or hamburger-style, if you had one of those elementary school teachers). Then cut along the fold, and fold each half in half again. So you'll get two cards out of one sheet of cardstock.
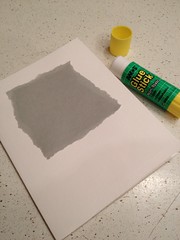
Then tear a square, maybe 3 inches on each side, out of the construction paper. You can cut a precise square if you prefer, but I really liked the raw edge look of torn paper. Glue this onto the front of your card.
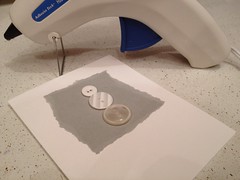
Next, hot glue three buttons on top of the construction paper. I lined up the holes vertically on the two lower buttons, so as to resemble the buttons down the front of a snowman, and made the holes horizontal on the top button to look like eyes.
Finally, embellish as you like. I used a blue marker to write "Let it snow" at the bottom, but feel free to change it up a bit.
Now that you've made one card and are happy with the results, you can set up an assembly line that would make Henry Ford proud. Fold, fold, fold. Cut, cut, cut. Glue, glue, glue. I was able to crank out a few dozen of these in only a few minutes... after hours of sifting through my buttons stash, of course.
Monday, December 03, 2012
Half-Pony-Half-Monkey Monster
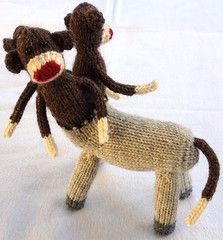
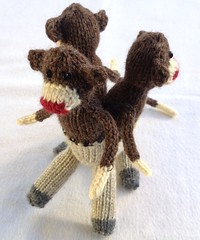
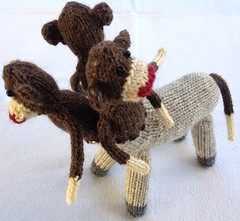 Sunday evening, I indulged my nerd side, which perhaps implies I have a non-nerd side, doesn't it, and that's entirely inaccurate. But that's neither here nor there. A friend and I had the opportunity to attend a Jonathan Coulton concert here in Dallas. If you don't know who that is, go here. I'll wait. Awesome, no? So this little guy is an homage to Skullcrusher Mountain, the first of his songs I ever heard. I created it as a gift to the man himself, his birthday being the day before his Dallas show. I hold no illusions that I'm the first fangirl to do this, but he seemed to appreciate it. It has apparently joined the menagerie on his tour bus. And now you can make one of your very own!
Also available as a free pdf!
Download through Ravelry!
Yarn:
Small amounts of worsted weight yarn in beige, brown, grey, cream, and red
Sample was knit with the following:
Lion Brand Fisherman's Wool [100% wool; 465yds/425m per 8oz/225g skein]; 35yds/32m in #123 Oatmeal and 20yds/19m in #126 Nature's Brown
Lion Brand Wool-Ease Worsted [20% wool, 80% acrylic; 197yds/180m per 3oz/85g skein]; 6yds/6m in color #152 Oxford Grey and 2yds/2m in #138 Cranberry
Hobby Lobby I Love This Wool! [100% wool; 220yds/201m per 4oz/113g skein]; 16yds/15m in color #10 Ivory
Red Heart Heart & Sole [70% wool, 20% nylon; 213yds/195m per 1.76oz/50g skein]; 2yds/2m in color #3012 Black
Other Materials:
Hobby Lobby I Love This Wool! [100% wool; 220yds/201m per 4oz/113g skein]; 16yds/15m in color #10 Ivory
Red Heart Heart & Sole [70% wool, 20% nylon; 213yds/195m per 1.76oz/50g skein]; 2yds/2m in color #3012 Black
Other Materials:
US #2/2.75mm double-pointed needles
Tapestry needleWaste yarn
Stuffing
6 small black beads
Finished Measurements:
Approximately 8in/20cm tall and 8in/20cm long
Gauge:
Not really that important, but about 22 sts/31 rows = 4in/10cm in stockinette stitch
Click here for Abbreviations
Special Abbreviations:
kww = knit with wrap = Insert right-hand needle upward through wrap, then through stitch, and knit the two together.
PATTERN
 Pony Body:
With beige, using backwards loop method, CO 3 sts and slide to other end of dpn.
Round 1: kfb 3 times - 6 sts.
Distribute to dpns and join to work in the round.
Round 2: k
Round 3: kfb 6 times - 12 sts.
Round 4: k.
Round 5: [kfb, k1] 6 times - 18 sts.
Round 6: k.
Round 7: [kfb, k2] 6 times - 24 sts.
Round 8: k.
Round 9: [kfb, k3] 6 times - 30 sts.
Rounds 10-29: k.
Short-Row 30: k27, w&t.
Short-Row 31: p24, w&t.
Short-Row 32: k21, w&t.
Short-Row 33: p18, w&t.
Short-Row 34: k15, w&t.
Short-Row 35: p12, w&t.
Short-Row 36: k9, w&t.
Short-Row 37: p6, w&t.
Round 38: k6, [kww, k2] 4 times, do not turn.
Round 39: [k2, kww] 4 times, k18.
Repeat Short-Row 30-Round 39 twice more.
Knit 1 round.
 Monkey Bodies:
Cut beige and join brown.
Round 1: p.
Round 2: [kfb, k8, kfb] 3 times - 36 sts.
Round 3: [kfb, k10, kfb] 3 times - 42 sts.
Round 4: [kfb, k12, kfb] 3 times - 48 sts.
Round 5: [kfb, k14, kfb] 3 times - 54 sts.
Round 6: [kfb, k16, kfb] 3 times - 60 sts.
Lightly stuff body. Transfer last 40 sts to waste yarn and distribute first 20 sts to dpns.
Round 7: k20 and join to work in the round.
Rounds 8-15: k.
Round 16: [k3, k2tog, ssk, k3] twice - 16 sts.
Round 17: [k2, k2tog, ssk, k2] twice - 12 sts.
Round 18: k.
Round 19: [k2, kfb twice, k2] twice - 16 sts.
Round 20: [k3, kfb twice, k3] twice - 20 sts.
Rounds 21-28: k.
Round 29: [k2, k2tog] 5 times - 15 sts.
Round 30: k.
Round 31: [k1, k2tog] 5 times - 10 sts.
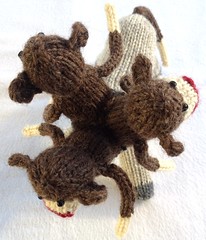 Round 32: k2tog 5 times - 5 sts.
Cut yarn, thread through remaining loops, pull tight, and tie off. Transfer first half of live sts from waste yarn to dpns. Join to work in the round. Join new strand of brown, leaving long tail (about 12in/30cm) for sewing later.
Repeat Rounds 7-32 and tie off.
Stuff the first two monkeys. Transfer last 20 live sts from waste yarn to dpns, and join new strand of brown.
Repeat Rounds 7-32 for third monkey, pausing to stuff after Round 28 and again for tying off.
Use long tail to secure hole in center between monkeys.
Pony Leg (make 4):
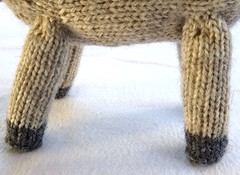 With grey, using backwards loop method, CO 3 sts and slide to other end of dpn.
Round 1: kfb 3 times - 6 sts.
Distribute to dpns and join to work in the round.
Round 2: kfb 6 times - 12 sts.
Round 3: p.
Rounds 4-7: k.
Cut grey and join beige.
Rounds 8-27: k.BO, stuff firmly (to provide support), and sew to body.
Monkey Arm (make 6):
With brown, using backwards loop method, CO 4 sts, leaving long tail for sewing later, and slide to other end of dpn. Work i-cord for 12 rounds. Cut brown and join cream. Work 6 more rounds of i-cord.
Final round: k2tog twice, slip first st over second st and off needle.
Cut yarn and tie off. Sew to monkey bodies.
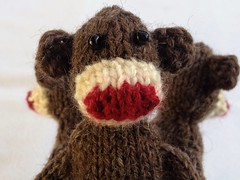
Monkey Ear (make 6):
With brown, using backwards loop method, CO 5 sts, leaving long tail for sewing later.
Row 1: sl1, k4.
 Repeat this row twice more.
Row 4: sl1, k2tog twice - 3 sts.
BO. Sew to monkey heads.
Monkey Mouth (make 3):
With red, using magic cast-on method, CO 8 sts (4 on each needle).
Round 1: [kfb, k2, kfb] twice - 12 sts.
Cut red and join cream.
Round 2: k.
Round 3: [kfb, k4, kfb] twice - 16 sts.
Round 4: k.
BO, leaving long tail for sewing later. Stuff and sew to faces.
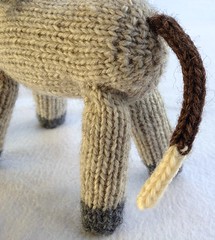 Monkey Tail:
With brown, using backwards loop method, CO 4 sts, leaving long tail for sewing later, and slide to other end of dpn.
Work i-cord for 16 rounds.
Cut brown and join cream.
Work 8 more rounds of i-cord.
Final round: k2tog twice, slip first st over second st and off needle.
Cut yarn and tie off. Sew to pony butt.
Finishing:
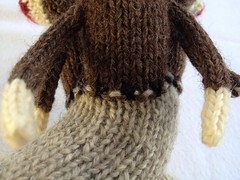 With black, embroider sutures along pony-monkey transition line. Sew on beads for eyes.
Weave in ends or hide inside body.
Feel free to comment here with questions.
This pattern is intended for personal use only. Please do not try to sell it or any product made from it. Thank you.
Subscribe to:
Posts (Atom)


