Tuesday, November 22, 2005

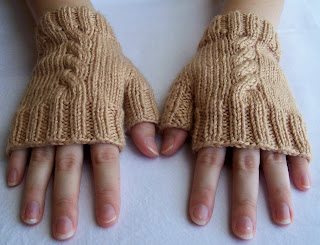
Cabled Fingerless Mitts

Keep your hands toasty, without reducing your dexterity, with these simple fingerless mitts. A basic stockinette stitch background and knit 2, purl 2 ribbing puts all the focus on the cable down the back of the hand. An easy six-stitch cable, twisted every six rounds, makes this an ideal project for first-time cablers. Plus, symmetric cables teach the knitter the difference between holding the cable needle in front or in back of the work.

Now available as a free pdf!
Download through Ravelry!

Materials:
Caron Simply Soft (100% Acrylic, 3oz/85g, 165yds/151m) one skein in 2616 Toasted Almond
US 6 (4mm) double-pointed needles
Two stitch markers
Stitch holder or waste yarn

Gauge:
24 sts =4in (10cm) in stst on US 6 (4mm)

Finished Size:
Women’s Medium - 7in (18cm) hand circumference

Click here for Abbreviations
Pattern:
Right Mitt:
CO 44 and distribute to 3 dpns. Join to work in the round, being careful not to twist. Work 10 rnds in k2,p2 ribbing.
Rnds 1-5: k19, p1, k6, p1, k17.
Rnd 6: k19, p1, FC6, p1, k8, pm, m1, k1, m1, pm, k8.
Rnds 7-8: k19, p1, k6, p1, k19.
Rnd 9: k19, p1, k6, p1, k8, m1, k3, m1, k8.
Rnds 10-11: k19, p1, k6, p1, k21.
Rnd 12: k19, p1, FC6, p1, k8, m1, k5, m1, k8.
Continue in this manner, inc'ing just inside markers every 3 rnds and twisting cable every 6 rnds, until there are 13 sts between markers for thumb gusset (Rnd 21). Transfer these 13 sts to a stitch holder or waste yarn. Waste yarn works better because it's flexible.
Rnd 22: k19, p1, k6, p1, k8, CO 1 st, k8.
Rnd 23: k19, p1, k6, p1, k17.
Rnd 24: k19, p1, FC6, p1, k17.
Continue in this manner, working even and twisting the cable every 6 rounds until piece measures 5in (13cm) from beg, about 39 rnds total, ending 5 rnds after a twist. Work 10 rnds in k2,p2 ribbing. BO all sts.
Thumb:
Distribute 13 sts on waste yarn to 3 dpns. Attach new ball of yarn, and pick up 3 sts in valley between thumb and palm. Knit 1 rnd. Work 10 rnds in k2,p2 ribbing. BO all sts. Weave in ends.
You may want to reinforce the valley between thumb and palm or close the hole if you have one. Left Mitt:
Work as for Right Mitt, reversing all shaping and using BC6 instead FC6 so the cables will be symmetric.

Feel free to comment here with questions.

This pattern is intended for personal use only. Please do not try to sell it or any product made from it. Thank you.

Tuesday, September 13, 2005

Tweedy Purse

Carry your keys in style with this easy-to-knit handbag. After a rectangular base is made working in rows, stitches are picked up on the remaining three sides and worked in-the-round on double-pointed needles. Seed stitch gives this variegated yarn a trendy, tweed-like look, and smaller-than-recommended needles mean a denser fabric, eliminating the need for a lining. Two I-cord straps are attached on the sides of the top, and a button and small pom-pom with uncut loops add a little extra something on the front.

Materials:
TLC Essentials (100% Acrylic, 6oz/170g, 312yds/285m) one skein in Surf & Turf (discontinued)
US 5 (3.75mm) double-pointed needles
One small turquoise button
Tapestry needle

Gauge:
22 sts = 4in (10cm) in seed st on US 5 (3.75mm)

Finished Size:
7in (18cm) wide by 7.5in (19cm) tall with 15in (38cm) straps


Pattern:
CO 32. Using only two dpns, work 8 rows in seed st ([k1, p1] on odd rows and [p1, k1] on even rows). Leaving active sts on one needle, use two other needles to pick up 6 sts on one end of rectangle, 32 along cast on edge, and 7 on other end (6 + 16 sts on one needle, 16 + 7 sts on the other). Begin working in seed st in the rnd ([k1, p1] all the way around since there is an odd number of sts). Continue even in seed st until purse measures about 7in (18cm) from beg. BO all sts.
Make two 15in (38cm) lengths of 4-st I-cord and attach one end of each to each side of purse. Make a small, loose pom-pom, but do not cut loops. Attach it to one corner along with a small turquoise button.

Feel free to comment here with questions.

This pattern is intended for personal use only. Please do not try to sell it or any product made from it. Thank you.

Friday, April 15, 2005

Mitered Squares Scarf

This modern take on the classic argyle necktie adds a bit of colorful whimsy to any wardrobe. The diamonds down the center are made using a mitered (a.k.a. modular or domino) knitting technique, where stitches are picked up for two sides of the square and double-decreases are made in the middle of every other row until you come to a point. The triangles along the sides are just half of a diamond. This method gives a patchwork feel without the hassle of sewing seams.

Materials:
Lion Brand Watercolors (65% Acrylic, 35% Merino Wool, 1.75oz/50g, 55yds/50m) one ball each in 980-347 Purple Haze (A), 980-308 Blue Lagoon (B) and 980-373 Pond Green (C)
US 11 (8mm) straight needles
Tapestry needle

Gauge:
10 sts = 4in (10cm) in garter st on US 11 (8mm)

Finished Size:
5.5in (14cm) wide by 60in (152cm) long

Pattern:
First Diamond:
With color A, CO 20.
Row 1: k20.
Row 2: k8, k2tog, ssk, k8.
Row 3: k18.
Row 4: k7, k2tog, ssk, k7.
Continue in garter st, dec'ing 2 sts in the middle of every RS row, until only 2 sts rem. K2tog, tie off.
Right-Hand Triangle:
With B, pick up 10 sts along right selvage edge, starting from CO edge and working up to top point.
Row 1: k10.
Row 2: ssk, k8.
Row 3: k9.
Row 4: ssk, k7.
Continue in garter st, dec'ing 1 st at beg of every RS row, until 1 st rem, tie off.
Left-Hand Triangle:
With B, pick up 10 sts along left selvage edge of square, starting at top point and working down to CO edge.
Row 1: k10.
Row 2: k8, k2tog.
Row 3: k9.
Row 4: k7, k2tog.
Continue in garter st, dec'ing 1 st at end of every RS row, until 1 st rem, tie off.
Inner Diamond:
With C, pick up 20 sts along selvages edges of both triangles (10 sts on each). Work same as first diamond, dec'ing 2 sts in middle of every RS row, until 2 sts rem. K2tog, tie off.
Keep making triangles on the sides and squares in the middle until scarf reaches desired length, changing colors as often as you like, and ending with a square. Weave in ends.

Tie it like a man’s tie, wear it like a scarf or however you like.

Feel free to comment here with questions.

This pattern is intended for personal use only. Please do not try to sell it or any product made from it. Thank you.

Abbreviations

Here is a list of common abbreviations I use in my patterns:

am = adjust mount = slip 1 purlwise, slip back to left-hand needle knitwise
am2 = adjust mount of two stitches = slip 2 purlwise, slip back to left-hand needle knitwise individually
BC# = slip next half of # sts onto cable needle, hold in back, knit next half of # sts, knit sts from cable needle
beg = beginning
BO = bind off
circ = circular needle
cm = centimeters
cn = cable needle
CO = cast on
cont = continue
dec = decrease
dist = distribute
dpns = double-pointed needles
est = established
FC# = slip next half of # sts onto cable needle, hold in front, knit next half of # sts, knit sts from cable needle
ft = foot/feet
g = grams
in = inches
inc = increase
k = knit
k2tog = knit 2 together = insert needle into two stitches at once and knit as one stitch
k3tog = knit 3 together = insert needle into three stitches at once and knit as one stitch
kfb = knit front & back = knit 1 but do not slip old stitch off left needle, knit into back of same stitch, then slip old stitch off left needle
ksp = knit, slip, pass over = knit 1, slip it back to left needle, use right needle to pass second stitch on left needle over this stitch and off needle, slip stitch back to right needle to continue working
m = meter(s)
m1 = see m1L
m1L = make 1 left = pick up bar between the st just worked and the next st by inserting left needle under it from front to back, knit into back of this new stitch
m1Lp = make 1 left purlwise = pick up bar between the st just worked and the next st by inserting left needle under it from front to back, purl into back of this new stitch
m1R = make 1 right = pick up bar between the st just worked and the next st by inserting left needle under it from back to front, knit this new stitch
m1Rp = make 1 right purlwise= pick up bar between the st just worked and the next st by inserting left needle under it from back to front, purl this new stitch
mm = millimeters
oz = ounces
p = purl
p2tog = purl 2 together = insert needle purlwise into two stitches at once and purl as one stitch
p3tog = purl 3 together = insert needle purlwise into three stitches at once and purl as one stitch
patt = pattern
pfb = purl front & back = purl 1 but do not slip old stitch off left needle, purl into back of same stitch, then slip old stitch off left needle
pm = place marker
psso = pass slipped stitch over
rem = remain(ing)
rep = repeat
rnd(s) = round(s)
RS = right side
sk2p = slip, knit 2 together, pass over = slip 1 knitwise, knit next two stitches together, use left needle to pass slipped stitch over knitted stitch and off needle
skp = slip, knit, pass over = slip 1 knitwise, knit next stitch, use left needle to pass slipped stitch over knitted stitch and off needle
sl1 = slip 1, purlwise unless otherwise noted
sm = slip marker
ssk = slip, slip, knit = slip 1 knitwise twice, knit these 2 together through back loop
ssp = slip, slip, purl = slip 1 knitwise twice, purl these 2 together through back loop
sssk = slip, slip, slip, knit = slip 1 knitwise thrice, knit these 3 together through back loop
sssp = slip, slip, slip, purl = slip 1 knitwise thrice, purl these 3 together through back loop
st(s) = stitch(es)
stst = stockinette stich = knit 1 row, purl 1 row if working back and forth; knit every round if working in the round
tbl = through back loop
tog = together
w&t = wrap and turn = if knitting, bring yarn to front between needles, slip next stitch as it to purl, bring yarn to back between needles, slip wrapped stitch back to left needle; if purling, bring yarn to back between needles, slip next stitch as it to purl, bring yarn to front between needles, slip wrapped stitch back to left needle
WS = wrong side
wyib = with yarn in back
wyif = with yarn in front
yd(s) = yard(s)
yo = yarn over = if knitting, bring yarn to front between needles, then up and over right needle and to the back of work; if purling, bring yarn up and over right needle and to the back of work, then to front between needles
yo-b = yarn over backward = if knitting, bring yarn up and over right needle, then between needles to back of work; if purling, bring yarn to back between needles, then up and over right needle to front of work