


Wanna see how I did it?
Materials:
T-shirt that's at least a size too big for you
1/4-inch elastic, a third the length of your bust (so 36" bust --> 12" elastic)
Sewing machine
Thread
Needle for a tiny bit of hand sewing
Pins
Safety pin for threading elastic through pocket
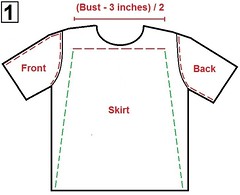
Step 1: Measure your bust and subtract 3 inches for negative ease; divide by two to get the width of your dress. Turn the shirt inside-out, and sew along the green dotted lines below. Then cut just outside that sewn line as well as along all the red dotted lines. Notice that one sleeve will be cut down the top of the shoulder, and the other is cut along the underarm seam. If your tee has a logo on one sleeve, like my red one did, make that the sleeve you cut down the underarm. This logo will end up in the center of your back.
Step 2: Take the sleeve that will now become the back (the one you cut along the underarm seam), and cut off the hem, as close to the hem as possible. Set this piece aside; it will be used as the neck strap later. Now cut out a rectangle from the rest of the sleeve to become the back panel. The height is up to you, but I would recommend making it as tall as possible. You can always trim off more later.
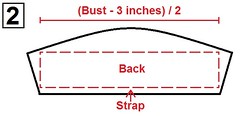
Along the top edge of the back panel, fold over and sew a 1/2-inch pocket for your elastic. Use your safety pin to help feed the elastic through this pocket. Pin the ends of the elastic so they don't get lost in the pocket. You'll sew these down in the next step.
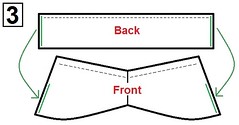
Step 3: Sew the front panel (the sleeve you cut along the top of the shoulder) and the back panel together along the green lines below, with right sides facing. The original sleeve hem on the front panel will be the new neckline, and the elastic pocket will be the top of the back panel. When you sew these side seams, make sure to catch the ends of the elastic on each side.
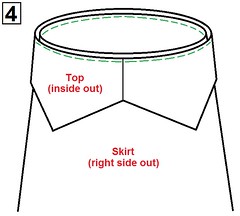
Step 4: Now you need to decide, if there was a logo on your t-shirt, whether you want that logo over your lady parts or on your bum. I opted for the latter, but that's your call. With the skirt portion right-side-out and the top portion inside-out, align the logo with the center of either the back or front panel, depending on your choice above, and sew all the way around the edge. Make sure to use a zig-zag stitch on this seam, so it'll stretch over your shoulders/bust when you put the dress on.
Step 5: Take that sleeve hem you cut off earlier, and attach it to one corner of the front panel with a little square of stitching, as below. Try on your dress to determine how long your neck strap should be. Sew the other end to the other corner of the front panel, being careful not to twist the strap, and you're almost finished!

Step 6: Take your needle and thread, and run a basting stitch along the inside of the vertical seam at the center of the front panel. Pull the thread tight to cinch up the fabric and tie it off. And you're done!
And following the success of my experiment with the red tee, I went ahead and repeated this process for the Stars shirt.
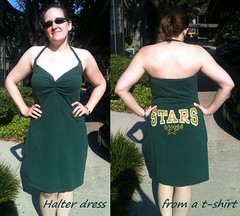

This is awesome!
ReplyDeleteTotally amazing!!!
ReplyDeleteYou are ingenious and a very easy read. I love your sense of humor too. Thanks for your generous and entertaining tutorial. I have a bag full of old silk Hawaiian shirts I want to upcycle. My search for that is how I found your article. Best wishes! A fellow artisan.
ReplyDelete