


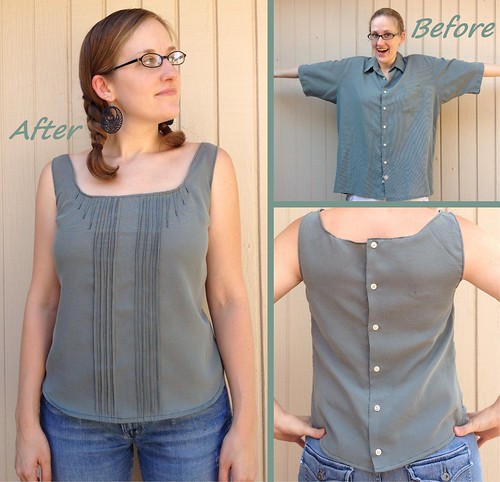
To recap, it began with this free shirt, complete with holes and bleach stains.
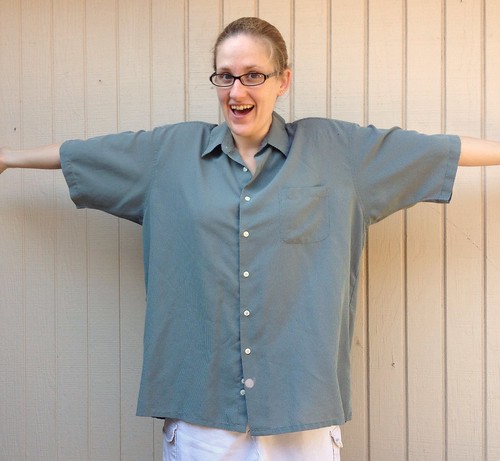
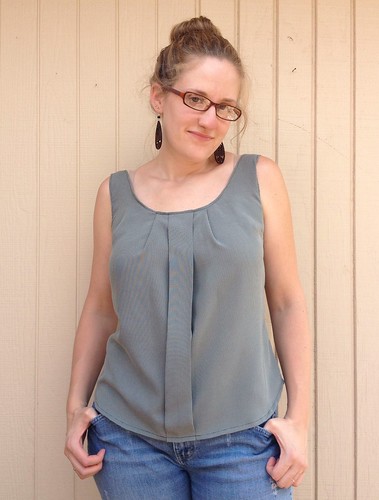
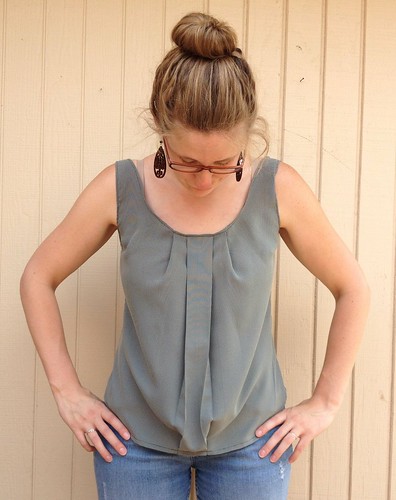
I used the Sorbetto pattern (purely as inspiration though, so it cannot be blamed in any way for my failure). The end result would have been totally fine if only the pleat would have behaved itself.

But I loved the buttons down the back! I just had to save this project somehow.

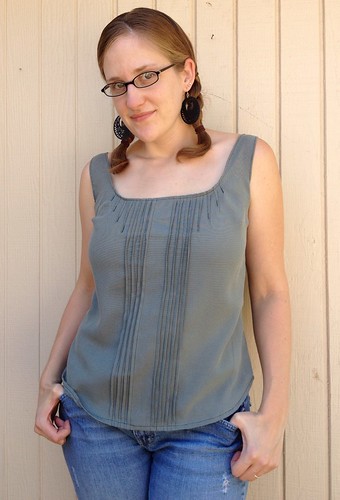
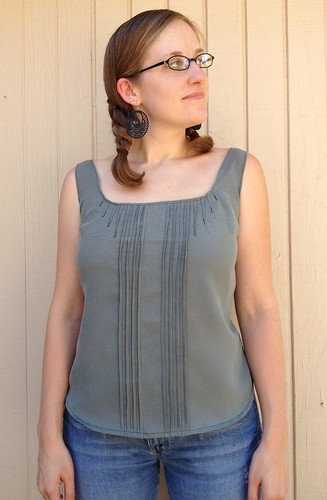
So I called on all of you, dear readers, for help, and boy, did you pull through for me! I thought about just tacking down the inside of the pleat to be done with it. But you all had so many wonderful suggestions, I knew I had to go a step further and make this a top I would truly love. Theresa had a great idea - pintucks! With the fabric's lack of drape, more structure was really what it needed.
So, after a few weeks in time out to think about what it had done, I retrieved the top from its cell (i.e., my closet) today. It expressed genuine remorse for its actions and promised to behave better this time, so we got right down to business.
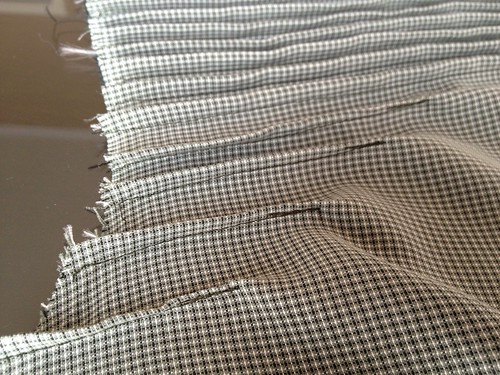
I picked out the top and bottom hems and gave the front a good press.
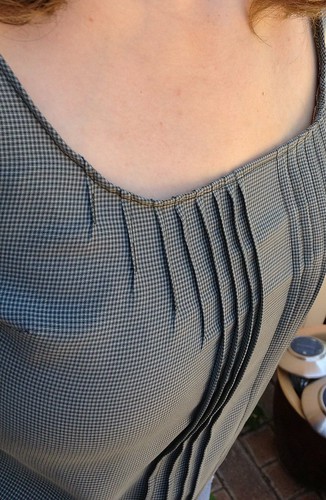
Then I marked off the top and bottom edge at 1-inch intervals. Starting in the center and working my way out, I folded the fabric from pin to pin, and stitched 1/4 inch from the fold all the way down the front.

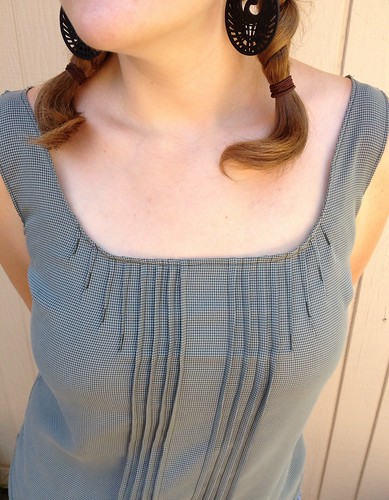
In order to take in more fabric around the neckline, I added four more pintucks on each side, starting at 4 inches long, then becoming progressively shorter as I went outward. I also tapered these pintucks, kind of like an inside-out dart, so there wouldn't be too much puckering at the ends.
When I went to press my pintucks, I realized that having an odd-number of them sort of hindered the symmetry thing (which direction do you press the center one - right or left?) So I just decided to remove it instead. Then I pressed my pintucks outward, toward the side seams - the right-hand tucks to the right and the left-hand ones to the left. Finally, it was time to rehem the top and bottom edges.
I am so glad I decided to ditch the pleats. I like the pintucks so much better, and I don't have to worry as much as about re-ironing this top every time I wash it.

You've done an amazing job!! Well done!
ReplyDeletewww.angelfairydust.blogspot.com
Thanks, Lauren!
DeleteThat came out perfectly- it's a really cute top now! Congrats- maybe one day I'll get up the guts to try something like this. :)
ReplyDeleteYou can do it, Heather! I believe in you!
DeleteVery nicely executed!!! I especially like the 4 graduated length tucks on the upper bust area along with the squared neck line, which is very creative. The tucking compliments the fabric design.
ReplyDeleteMontana Lady
The squared neck line was actually just a happy accident - a result of those extra pintucks on the sides. As you can see from my original "after" pics, I had been going for a curved neck line. Oh well! I like the square better too!
DeleteIt looks really good. And I prefer your square neckline to the original sorbetto one.
ReplyDeleteThanks, Zom! I didn't intend the neck line to be squared-off - those extra pintucks on the sides did it - but I definitely like it better too!
DeleteGreat save!
ReplyDeleteThanks, Elle!
DeleteUAU Carissa! That's AMAZING!!! Great Refashion! One of my favorites!!!! And great hair style! ;)
ReplyDeleteKisses from Portugal!
Thanks, Helena! I'm so happy my hair is long enough for pigtails again!
DeleteEverything about this top works. It flatters you, the color is good on you,and the pintucks look even better than I ever imagined they would.
ReplyDeleteI like the pigtails on you too, they complete the look.
regards,
Theresa
Hey, it was your idea! :) Thanks, Theresa!
DeleteI love this! I have to try it. Great save and now you have a beautiful shirt. Great job!
ReplyDeleteThanks, Erin! Sometimes refashioning is all about going with the flow and being open to a change of plans. You might just end up with something better than your original idea!
DeleteOh my, it looks amazing! I love how you saved it! The smaller pintucks on the side or gorgeous and I love how the buttons look up the back! I'd totally wear a shirt like this!
ReplyDeleteThanks! I wasn't sure how the side tucks were going to turn out, but there was certainly extra fabric at the top that needed to be dealt with. Luckily, it came out well!
DeleteHi certainly the little pin tucks fit so well together with the bigger ones it looks so cool on you well done xxx
ReplyDeleteThank you, Chris!
Deletewow! well done! Now the shirt is perfect!!
ReplyDeleteThanks! I'm pretty pleased with it too! :)
DeleteGreat refashion. I admire your perseverance!
ReplyDeleteThanks, Barbara! I get by with a little help from my friends!
DeleteI think both versions are great! The first version is my favorite of the two though. I would have just not sewn the pleat into the bottom hem, which would work out great for me since I'm a big girl anyway. It would give me a little extra room to hide my chubb. LOL
ReplyDeleteI tried picking out the bottom hem, but sadly, it didn't help. The fabric just didn't have the right drape - it ended up looking more maternity-y than I would have liked.
Delete