This week, I'm celebrating the release of not one, but two new knitting patterns! And from now through the end of January, you can get 50% off these new patterns when you purchase both of them. That's two for the price of one! No coupon code required!
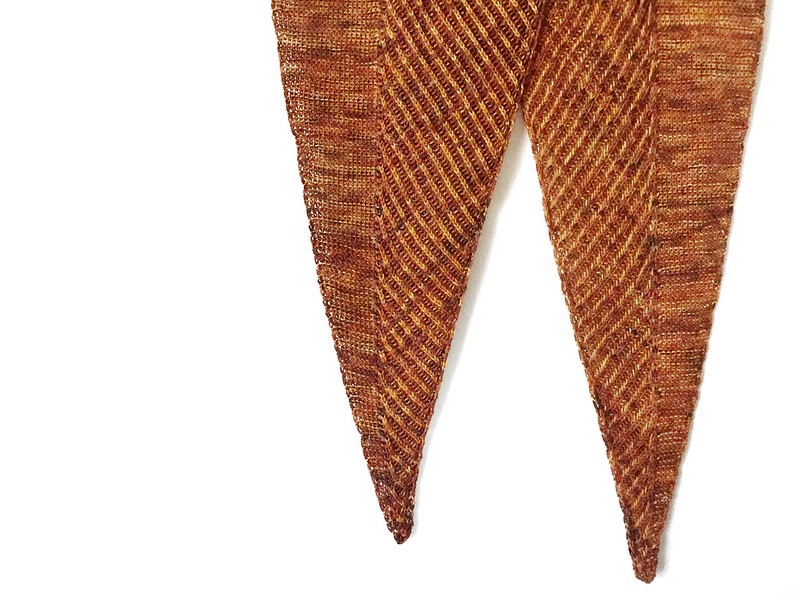
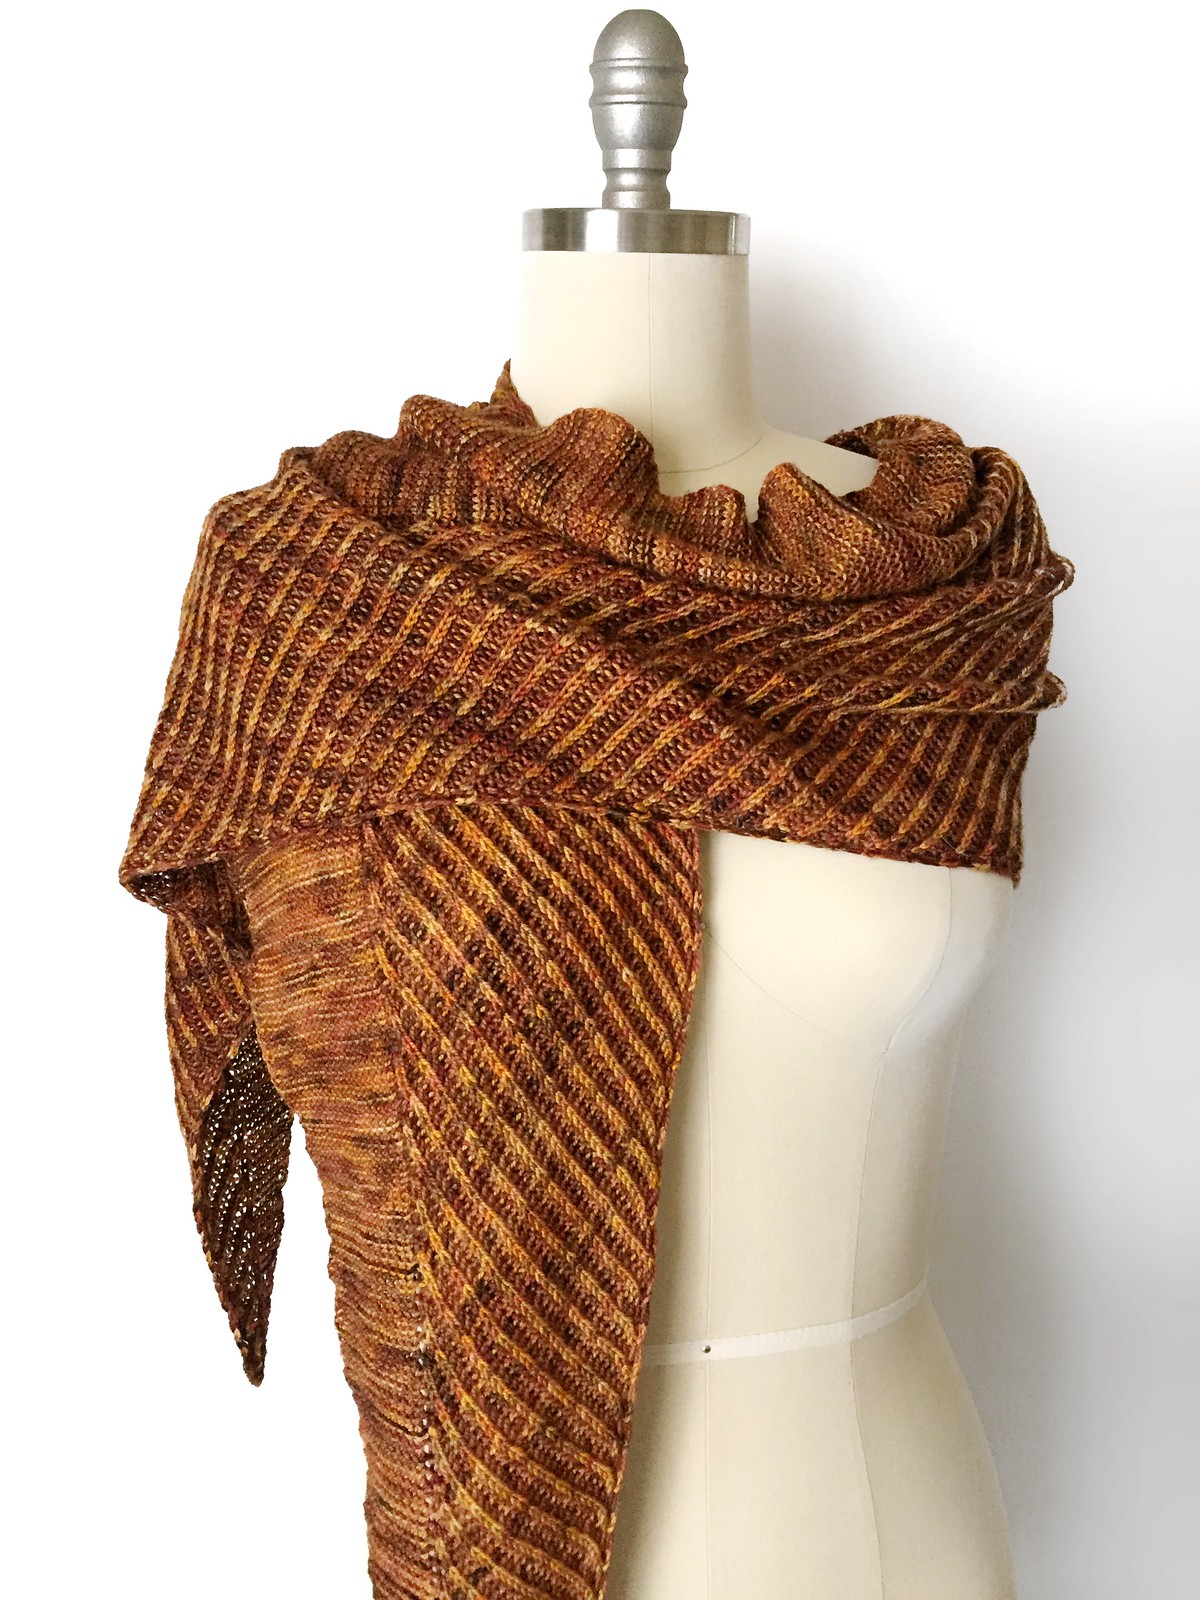
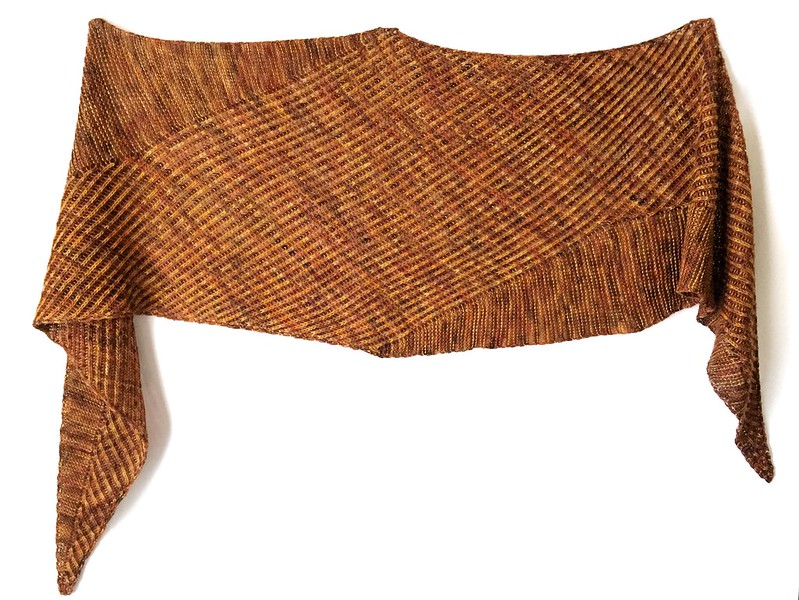
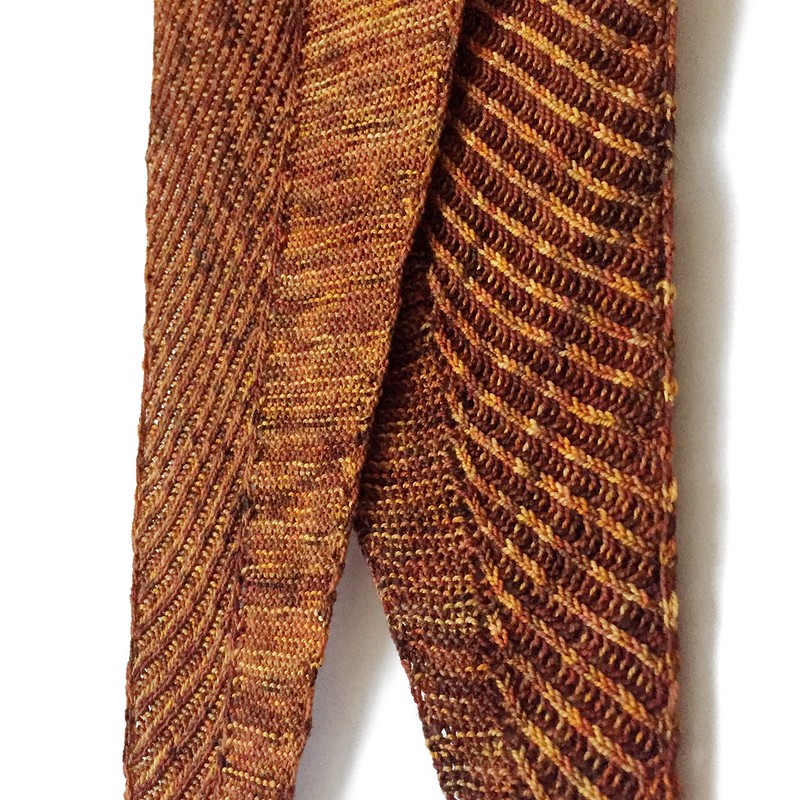
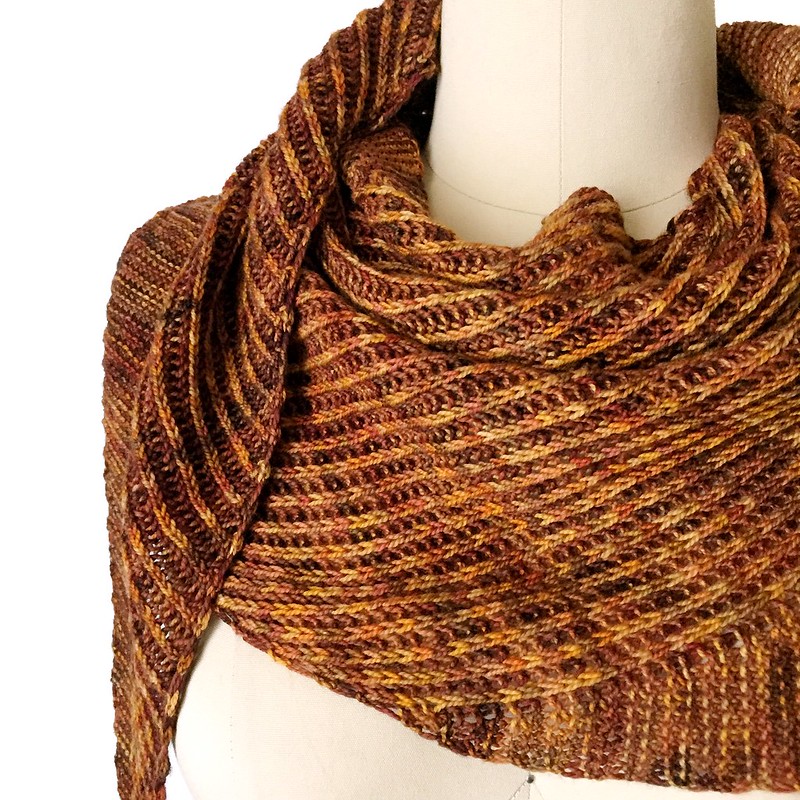
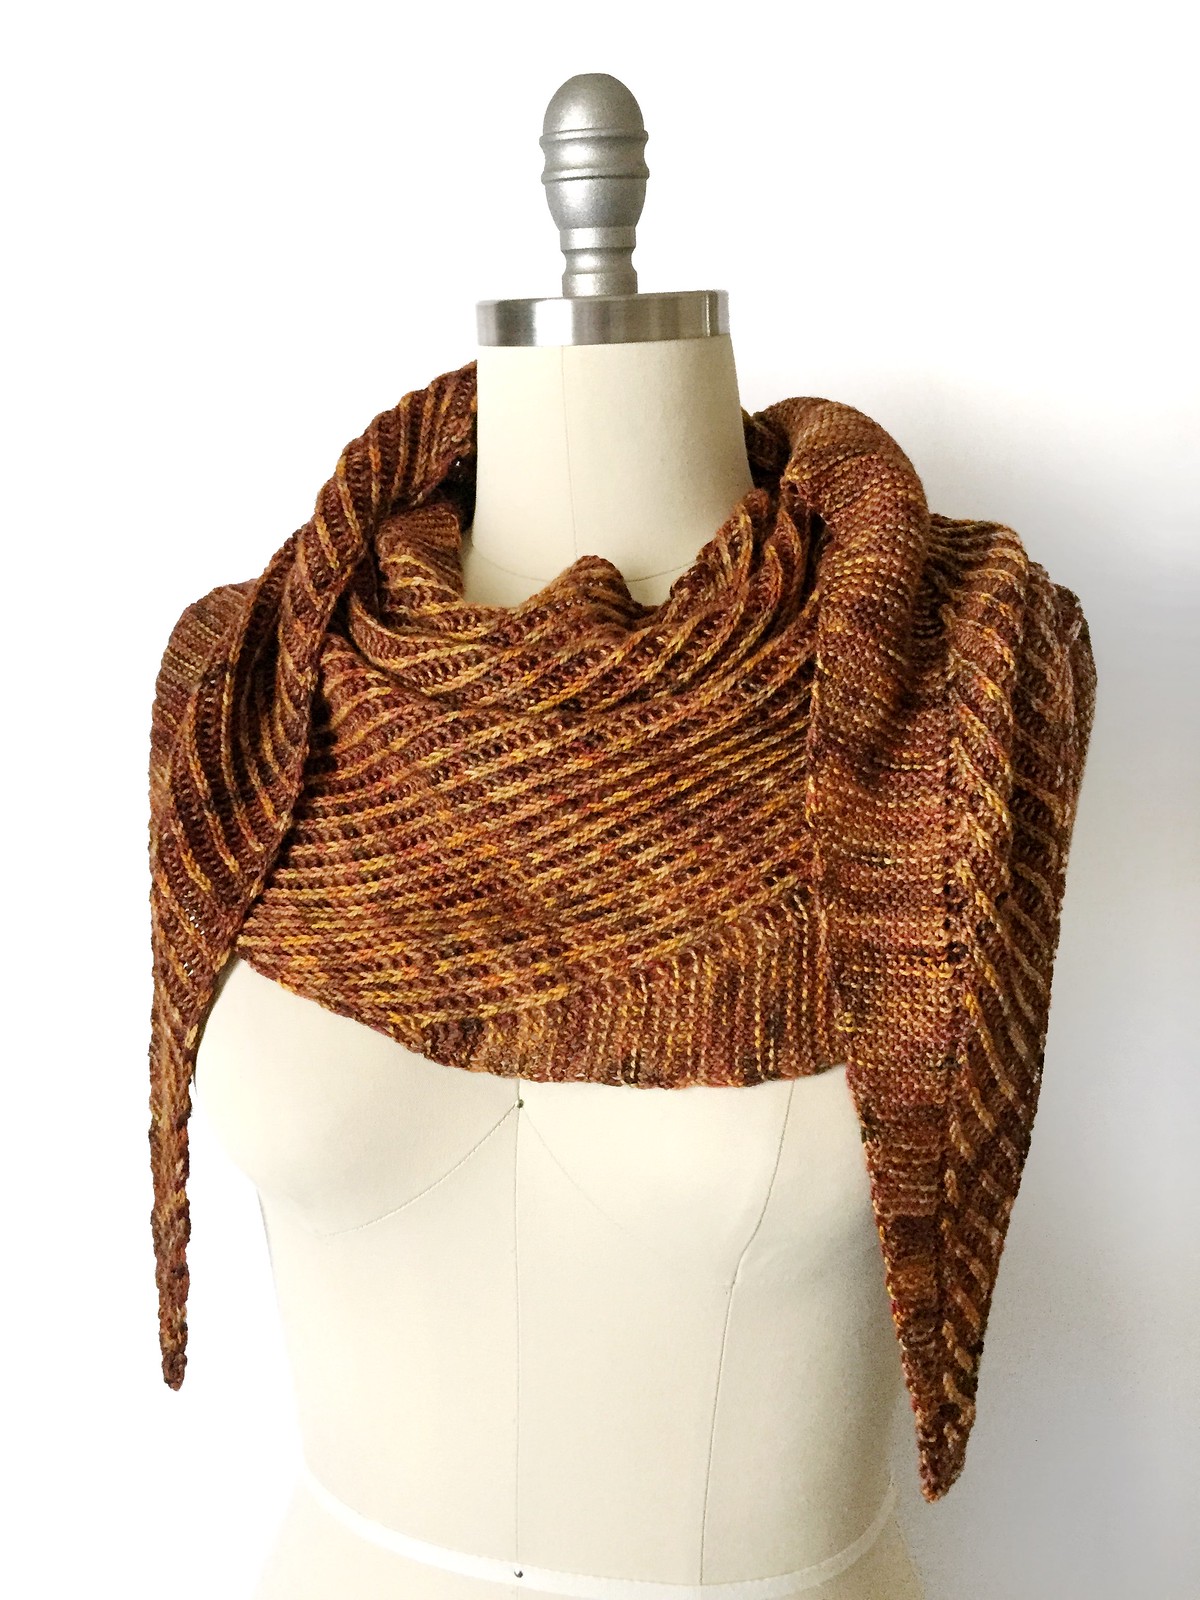
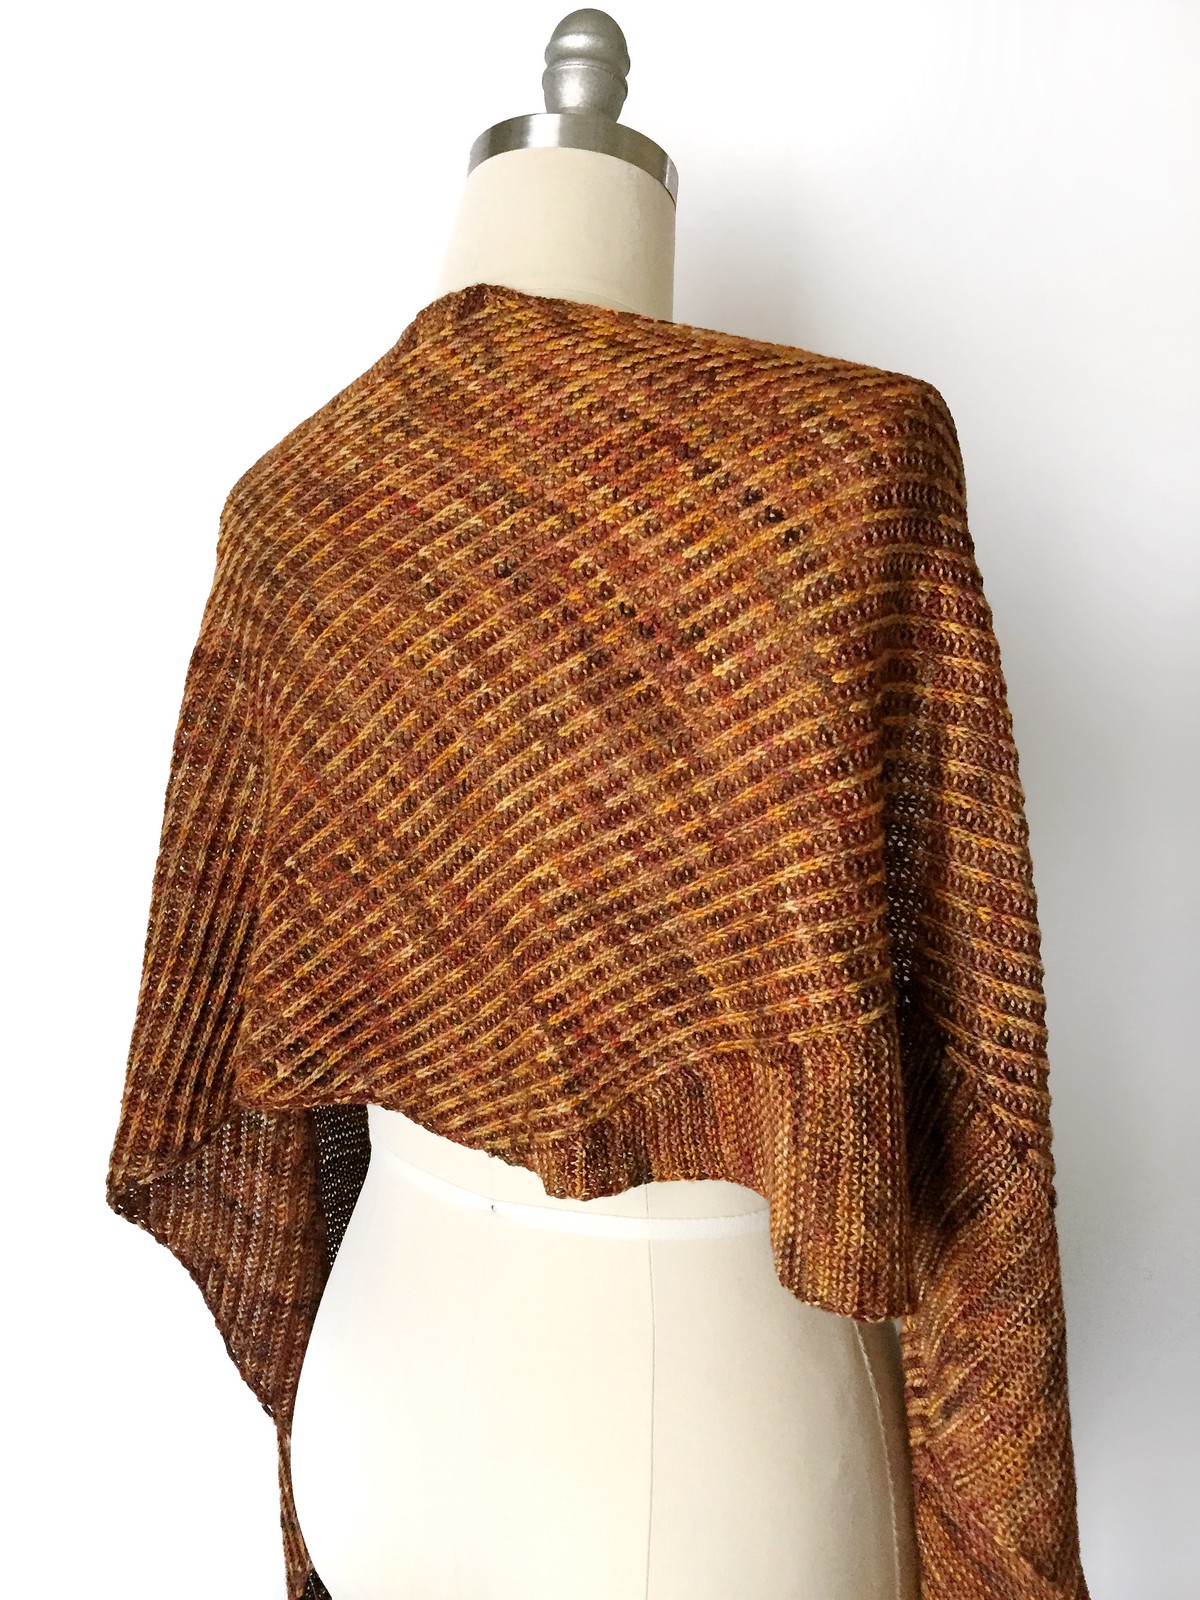
First, I'd like you to meet Spitfire. She's a saucy little minx with a quick wit and a sharp tongue, born of smoke and dragon's breath. No, really. The yarn is A Hundred Ravens' Iachos base in the Smoke and Breathing Fire colorways. Seriously gorgeous stuff!
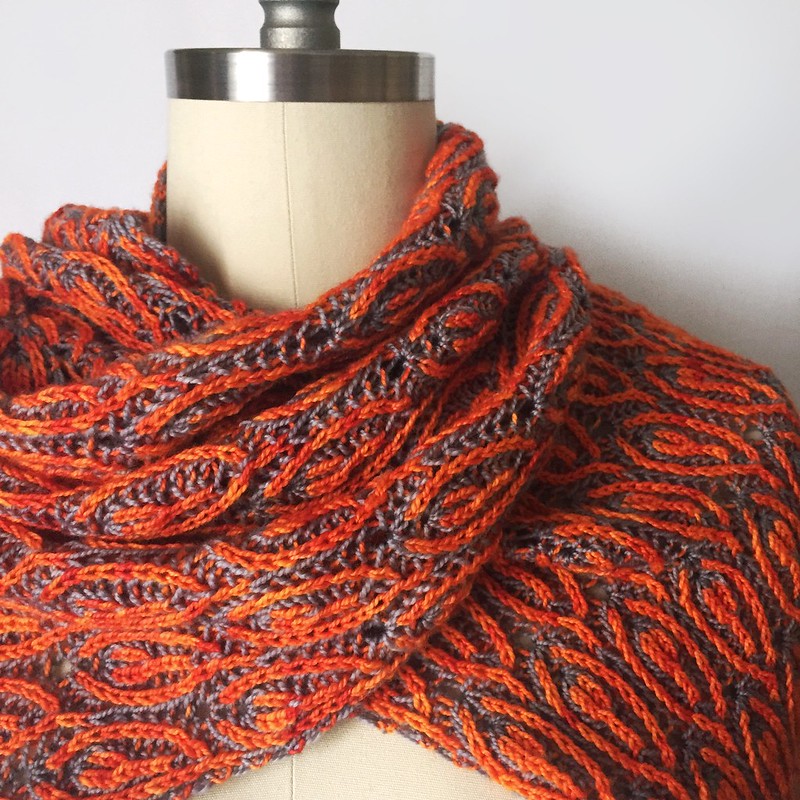
The design features a brioche motif of my own devising, perhaps not for the faint of heart but well worth the reward for those up to the challenge! The scarf begins at one tip and increases to the full width of the scarf, which you can easily customize if you like. Then you work even to the given length (or whatever length you desire) before decreasing back to a point again.
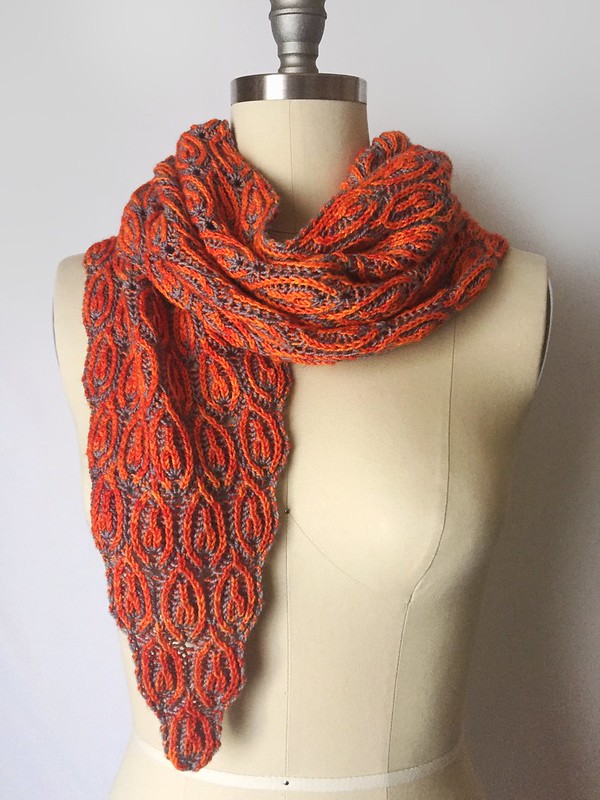
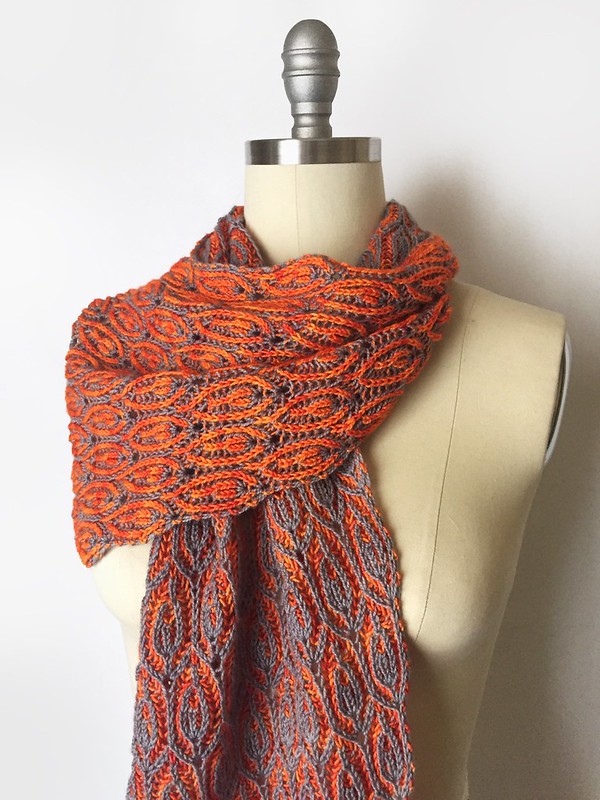
I like how the reverse side almost looks like dragon scales too, to complement the flames on the front. I'd love to see someone whip this up in shades of green though. I bet those flames would translate really well into leaves for a junglesque scarf instead.
SIZE
One size, easily adjusted
FINISHED MEASUREMENTS
Length: 72 inches
Width: 11 inches
GAUGE (after blocking)
18 sts/25 rows = 4 inches in basic bi-color brioche rib
MATERIALS
Fingering weight yarn, approximately 400yds/366m each of two colors
LC: A Hundred Ravens Iachos [100% merino; 400yds/366m per 100g skein]; color: Breathing Fire; 1 skein
DC: A Hundred Ravens Iachos [100% merino; 400yds/366m per 100g skein]; color: Smoke; 1 skein
US #3/3.25mm circular needle
Tapestry needle
Get more details about Spitfire on Ravelry!
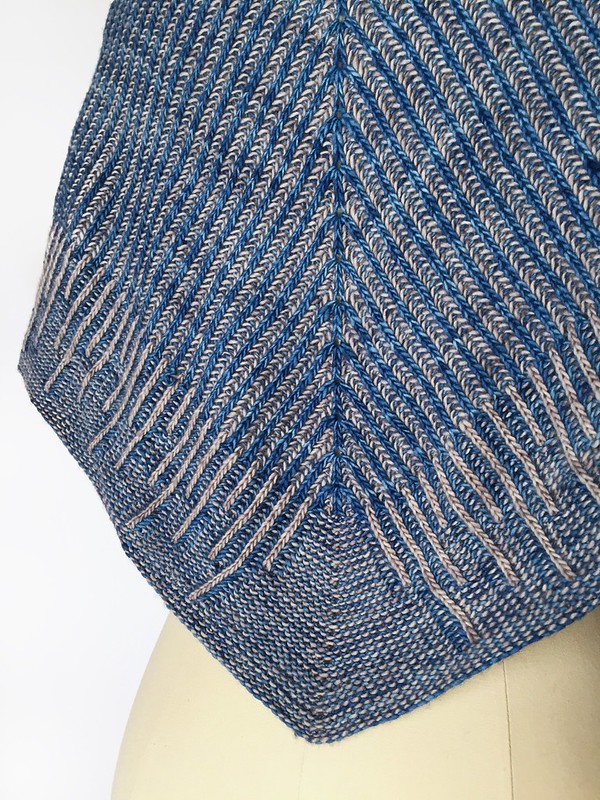
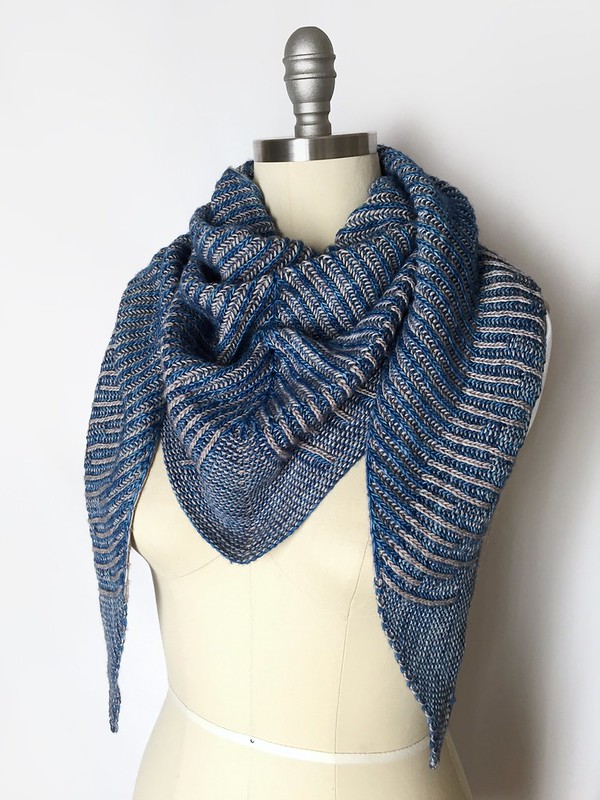
I'd also like to introduce Winter's Eave - another brioche design to keep you warm until all those icicles melt. This is a bit more straight forward than the first and will give you plenty of time to get used to the rhythm of brioche before mixing things up a bit for the border.
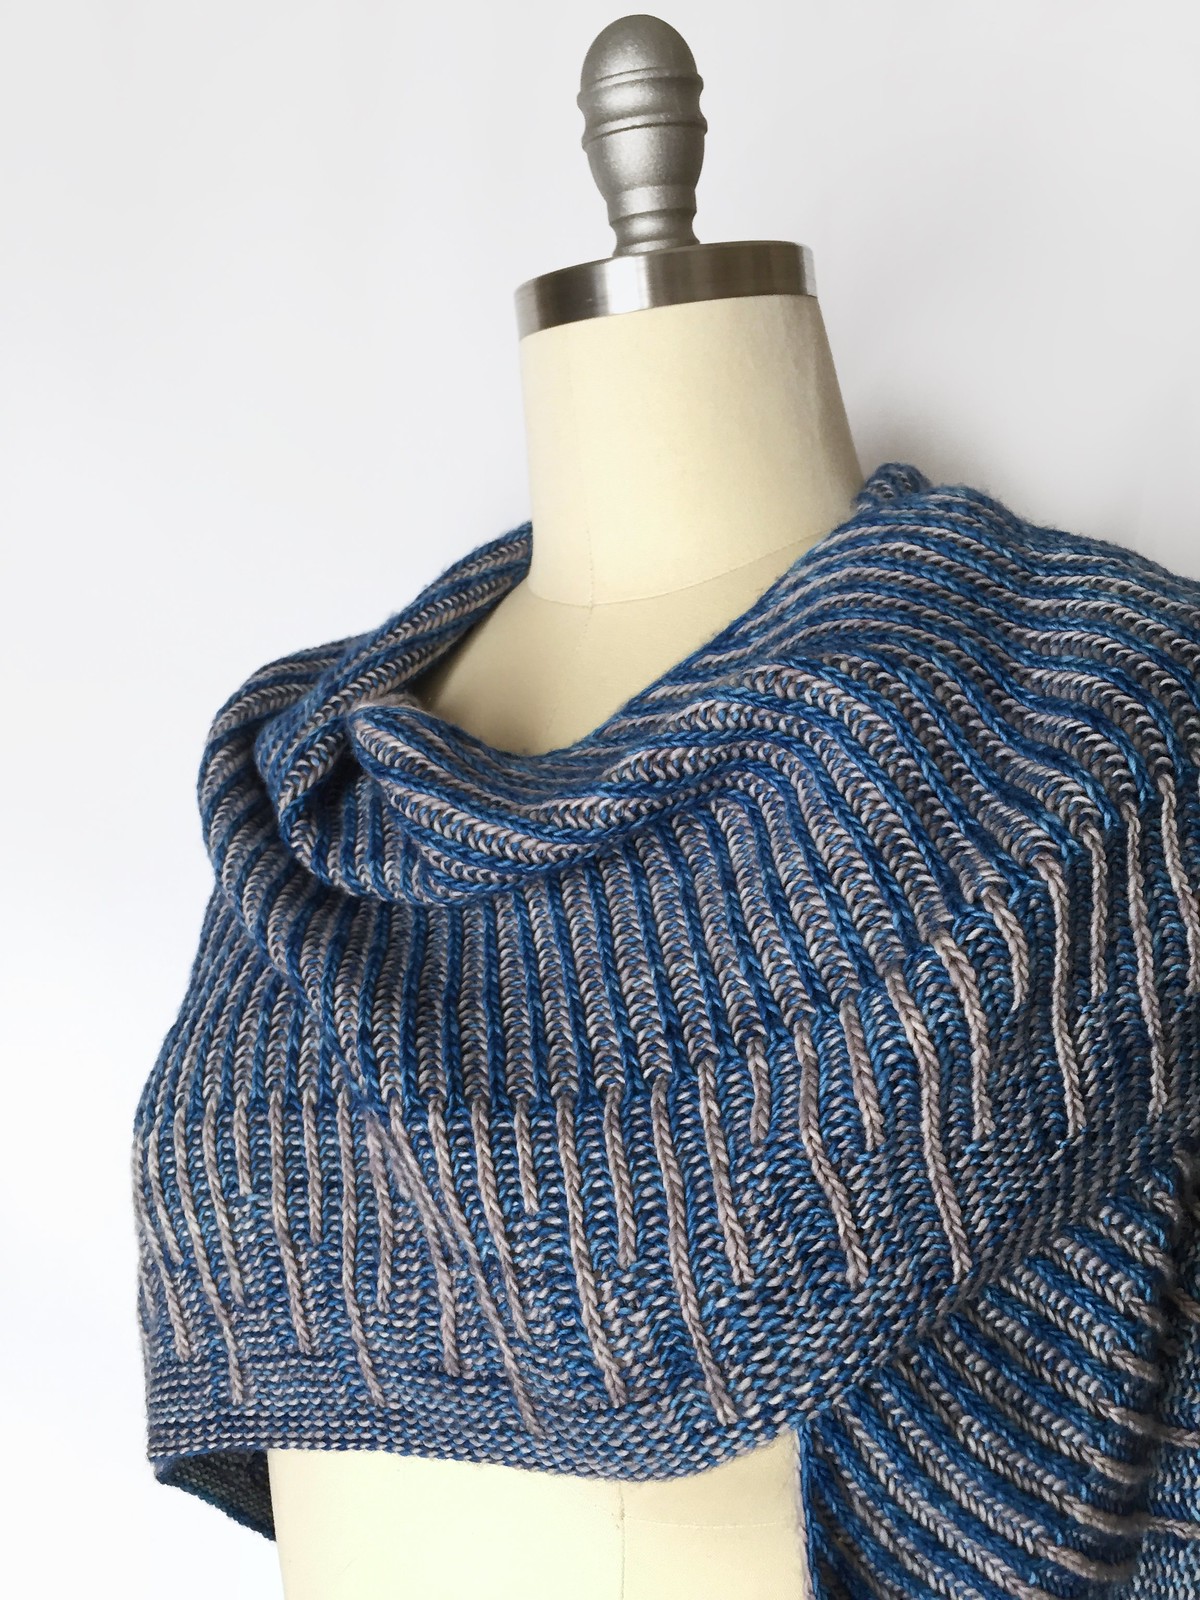
The Malabrigo Mechita single ply is simply luscious, and while the Impressionist Sky and Pearl colorways were used in the sample to evoke wintry vibes, I could see this being worked up in black or grey paired with a neon to resemble paint dripping at the edges.
SIZE
One size, easily adjusted
FINISHED MEASUREMENTS
Span: 72 inches
Height at center: 24 inches
GAUGE (after blocking)
17 sts/28 rows = 4 inches in brioche rib
MATERIALS
Fingering weight yarn, approximately 420yds/384m each of two colors
LC: Malabrigo Yarns Mechita [100% merino; 420yds/384m per 100g skein]; color: 36 Pearl; 1 skein
DC: Malabrigo Yarns Mechita [100% merino; 420yds/384m per 100g skein]; color: 806 Impressionist Sky; 1 skein
US #3/3.25mm circular needle
5 stitch markers (1 removable)
Tapestry needle
Check out Winter's Eave on Ravelry!
Monday, January 22, 2018
Sunday, December 24, 2017
Christmas Quickie
Whilst digging through my craft closet for gift wrap yesterday, my eyes instead fell on this buffalo plaid skirt. It's been hanging in there for months (years?) now, but for some reason, on this particular day, the sight of it gave me the immediate urge to sew something. I had no doubt, when I came across it at a clothes swap, that its soft wool blend fabric and pre-fringed edging would make a perfect winter accessory. Now was finally the time to make that happen!
First, I used my seam ripper to salvage the button and zipper, and also to separate the lining from the plaid around the back slit.
Next, I cut off the waistband (the photo of which has mysteriously disappeared from my phone) and picked out the darts. Then I stitched closed the back seam where the zipper and slit had been.
A final re-hemming of the top edge, and my new cowl was ready for a chilly night on the town.
I've been so preoccupied with yarn lately that my sewing machine had gathered a bit of dust, unfortunately. It felt really good to be able to whip something up in about 15 minutes.
I hope you're all enjoying some rest and relaxation and/or festive family gatherings. Happy holidays, everyone! See you in the new year!
Sunday, December 10, 2017
Wonder Woman Blankie
When one of my coworkers announced her pregnancy last summer, I was really hoping it would be a girl. She, her husband, and their daughter are all a bit obsessed with superheros, so I was itching for an excuse to knit up a modified Wonder Woman Wrap Blankie for the occasion. Shortly thereafter, she found out it was indeed another little girl, so I got to work! I've heard from several other crafters who've wanted to modify my patterns for other purposes, so I thought I'd share my blanket mods with you, just in case you're looking to do something similar. I used the knitted WWWrap as my starting point, but similar tweaks could also be made to the crochet version, if you're so inclined.
First off, I knew it needed to be machine washable since baby blankets are susceptible to all sorts of stains. I found just what I needed at my local Joann store in the form of Premier Yarns Deborah Norville Everyday Soft Worsted Solids. They have a wide array of colors, but I was drawn to their Really Red, Lemon, and Royal Blue. I grabbed two skeins each of the red and yellow and one skein of blue for the border. Then I went home and set about swatching!
With my worsted weight yarn and size 8 (5mm) needles, I cast on using the Wee size instructions in the pattern. Since I didn't want my blanket to grow in width quite as quickly as the original wrap does, I chose to only work the kfb increase at the beginning and end of every other row, rather than every row. I also slipped the first stitch of every row for a nice clean selvage edge - makes it easier to pick up for the border later! When I reached my desired blanket width, about halfway through the side stripes, I stopped doing the kfb increases altogether so the blanket width would stay constant after that. After finishing the Upper Triangles, I simply continued to knit even in garter stitch until I was almost out of red yarn, leaving enough for just one more row. Next, I made second piece exactly the first and grafted the two halves together in the center with kitchener stitch to form a hexagonal-ish blanket.
Finally, I grabbed my size H (5mm) crochet hook and worked a border all around consisting of four rounds of half double crochet stitches. Along the cast-on edges, I worked one hdc in each cast-on stitch; along the straight vertical sides, I worked one hdc in each selvage stitch (so 1 hdc per 2 garter rows); and along the angled increases edges, I did 3 hdc for every 2 selvage stitches (so 3 hdc per 4 garter rows). As I worked my border rounds, I did a double increase at each corner as well. I probably could've stood to pick up fewer stitches and/or do fewer increases since the border got slightly ruffly toward the end, but I think it still turned out fine. If you'd rather, you could certainly do a knitted border instead, but the thought of binding off that many stitches was not a pleasant one, so I opted for crochet.
I hope that helps give you some ideas of how to adapt this pattern to other uses. Enjoy!
Sunday, December 03, 2017
Modern Tapestry Crochet
I am not just a knitter. I'm a Knitter. Capital K. Everywhere I look, I see knitting. How I can I recreate that woman's sweater? Oh, that brick pattern would translate nicely to a knitted shawl! I'm a bit obsessive.
My crochet status, however, is strictly lowercase. Technically, I've been crocheting longer than I've been knitting, but once I picked up the needles, the hook just hasn't gotten as much love as it deserves. I've been trying to work on that lately because I do, in fact, enjoy crocheting and want to get better at it, to try new techniques and see what the craft can really do. With this in mind, I jumped at the chance to review a copy of Alessandra Hayden's Modern Tapestry Crochet.
To practice this new-to-me technique of crocheted colorwork, I chose her Evergreen Country Cowl pattern because its two-color southwest-esh design seemed like a fairly simple start to get my feet wet. I used some stash yarn - Patons SWS Soy Wool Solids in Natural Raisin and Natural.
The author explained everything so well. As a matter of fact, because I had actually read the instructional pages at the beginning of the book, I knew immediately what I'd done wrong when I noticed my cowl was developing an upside-down-funnel shape, narrowing as it went upward. I had been holding the unused color too tightly when crocheting around it causing the fabric to get tighter and tighter. That wouldn't do at all if I wanted it to fit over my huge head, so a'ripping we will go! My second attempt, holding the yarn a little differently for a looser gauge, turned out much more even (and wearable!).
I would highly recommend this book to anyone looking to level-up their hooking skills, or even experienced crocheters on the hunt for stylish, modern accessories. I already have my eye on a few more designs in this book for future projects.
Monday, November 20, 2017
Deflection Shawl
My latest obsession: Brioche stitch. Ask my knitting group - it's all I've been doing lately. It's such a simple technique to achieve striking results! You can make you stripes bright and bold, or more subtle and understated, just by choosing higher or lower contrasting yarns. I especially love mixing brioche with basic garter stitch, as in my latest pattern, the Deflection shawl.
Beginning at one point, the shawl is divided in two halves along a center spine, with each stitch pattern section slowly expanding. As you near the midway point, the brioche begins to encroach on the garter section while a second garter section appears on the opposite edge. After the brioche stripes reach the other side, you begin to decrease again, slowly tapering to a point once more.
This shawl is very easily adjusted for different sizes. If you weigh your yarn before you start, you can simply work the increasing rows until you have used up roughly a third of your yarns, or until the center spine measures roughly a third of your desired final length. Then follow the rest of the pattern as written (though your stitch counts may vary), and you’ve got yourself a custom-sized shawl. I've even experimented with making it much smaller for a neckerchief/headwrap and or even a tiny little wrist cuff!
SIZE
One size, easily adjusted
FINISHED MEASUREMENTS
Span: 78 inches
Height at center: 17 inches
MATERIALS
Fingering weight yarn, approximately 400yds/366m each of two colors
LC: Meadowcroft Dyeworks Yarn Rehab Rockshelter Sock [100% merino; 400yds/366m per 100g skein]; color: Apothecary; 1 skein
DC: Meadowcroft Dyeworks Yarn Rehab Rockshelter Sock [100% merino; 400yds/366m per 100g skein]; color: Belgische Chocolate; 1 skein
US #3/3.25mm circular needle
Tapestry needle
2 stitch markers
GAUGE (after blocking)
23 sts/32 rows = 4 inches in garter stitch
18 sts/32 rows = 4 inches in brioche rib
Buy the pattern on Ravelry now!
Sunday, October 15, 2017
AlterKnit Stitch Dictionary: 200 Modern Knitting Motifs
I recently received a copy of Andrea Rangel's AlterKnit Stitch Dictionary to review, and I couldn't have been more excited to flip through its pages.
As a designer, I often rely on my collection of stitch dictionaries to spark ideas. Unlike those already on my shelves, this new book is a little off-beat, just like me! It's chock-full of two-color stranded motifs that range from science-y to silly, and everything in between. Looking for adorable animals, gorgeous geometrics, or priceless pop culture references? Look no further!
In the back, you'll find an index where all the patterns are sorted by stitch count for super-simple substitutions. Want to liven up a basic beanie? Say you're working with 120 stitches per round. Browse through Andrea's library of swatches for something with a 10-, 12-, 15-, 20-, or 24-stitch repeat, and then just plug it into your pattern. How easy is that?
Or maybe you don't have a specific garment in mind yet? That's cool too. Andrea has provided five classic designs, along with tips on how to swap out motifs, if you're so inclined. I chose to work up her Bikey Beanie, which she shows with either bicycles or hearts to give you an idea of how of it would look with other designs. I thought it would be cute to make a whole set of hats for my niece and nephews, in coordinating colors and varying motifs to suit each of their personalities. Let's meet the menagerie!
First, it was elephants for Eleanor. These precious, pastel pachyderms will be perfect for my niece, who is approaching the one-year mark. My family has extremely large heads, so I googled infant head sizes and found the 99th percentile for 12-month-olds is 19 inches - an exact match for the small size for this hat pattern. Worst case, she'll grow into it. Since the elephant chart's stitch count wasn't quite right for the hat’s stitch count, I simply cast on four fewer to get the right multiple. Then for the crown shaping I omitted four of the decreases in the first decrease round. Aren't these little fellas adorable, all linked trunk to tail?
The middle kid is a climber with a penchant for primates, so monkeys were the only logical conclusion. I know from gifted hats of Christmases past that the nephews' heads are now about the same size as my own, so I used the larger size of the pattern for the boys' beanies.
Finally, the soon-to-be 13-year-old nephew. What better way to win the heart of a adolescent boy than with Poopin' Pigs, am I right? Yeah, you read that right. Andrea provides plenty of giggles throughout her book with some her more off-the-wall designs that are at least 9 kinds of awesome. I think these squattin' swine are sure to please!
The yarn I used was Louet Gems Fingering Weight in Terra Cotta, Pewter, Fern Green, and Navy. I've found this line to be an excellent workhorse yarn, available in several truly lovely solid shades with the extra bonus of being machine washable!
For all three hats, I used a tubular cast on because I love how it looks with ribbing. In the sections of colorwork with large swaths of a single color, I locked my floats by twisting the two strands every two stitches because baby fingers.
Cheers to having three holiday gifts finished by October!
Saturday, October 07, 2017
Birthday Pattern Sale
Tomorrow is my birthday, so let’s celebrate! Use promo code HAPPY35TH at checkout to get 35% off all my downloadable knitting patterns available through Ravelry! Click here to peruse my patterns and purchase before midnight (US central time) on Sunday October 8 to take advantage of this sale!
Subscribe to:
Comments (Atom)


